
Creating PeopleSoft Panels
Developing your first PeopleSoft application was not difficult at all. There was no code to write; no difficult logic to follow; no complicated methods and procedures at all. This is what makes PeopleSoft so popular. Almost everything can be done with a point-click-drag. This chapter will bolster your confidence a bit more. Practice creating more panels or applications, but this time around the panels that you create will replace panels some of PeopleSoft's own panels. You will be able to access and modify the same data sets that PeopleSoft panels do, through your own custom designed application. It is not hard at all. Again, there will be no coding.
Those working at PeopleSoft can be classified in two groups — the business people and the programmers. For an application to be successful, it must serve some purpose. It must be easy to use and easier to modify or customise. This is what the two teams in PeopleSoft did. Programmers did what they knew best — program. Trying to teach a programmer how to run a business made as much sense as trying to teach a business person to program. Understandably, one could get by knowing a little bit of the others work but overall, it was a waste of time.
This is precisely what happened for so long — and therefore any major application package took a long time to implement. PeopleSoft broke away from the mould. What the programmers did, was develop tools that business persons could use. How the tools were used, was of little importance to the programmer. And from the business persons point of view, how the tool was developed was not his concern. Looking deep into PeopleSoft, one will find that while technology has not taken a back seat, it has not been in the forefront either. Utility and usability is what the program is all about. Microsoft learned this a long time ago and made billions. The PeopleSoft people plan to do the same.
If you have moved up from PeopleSoft version 6 to version 7, you will find that there is a distinct improvement in the program. Both these groups, programmers and business logic people, have been slowly improving and refining their routines. The result is a much superior package.
Simplicity is the keyword around which PeopleSoft evolved, it appears. And as any Indian rishi will tell you, simplicity is the essence of life. As PeopleSoft gets closer to the basics of life, more users are drawn to it. Programmers however, are a different kettle of fish. There has always to be something more than what is specified in manuals and books, and in searching for these answers, some things lose their charm. If you follow this chapter closely, you will find a part of that mystique that is built around PeopleSoft is unfounded. There is nothing difficult or magical about the workings of PeopleSoft. It just has sound business rules put into place.
There are a few fundamental rules that are observed in PeopleSoft. Rule one, everything is stored in records or as is popularly known to RDMBSwallas — tables. And everything means everything. You name the object and there will be some table that keeps track of it. Think code and you will find this stored in the table PSPCMNAME. You want to find the fields you created, they are in another table with a few hundred thousand other fields created by PeopleSoft. Discovering which table stores what is a bit of a problem as there are a few zillion of them scattered about.
Another fundamental rule about PeopleSoft is that anything and everything you enter has to be through a panel. The P of PeopleSoft could well be for Panel. The fact that the entire program uses panels for everything could be a good reason to re-christen the program PanelSoft. Need to add some data? You use a panel. Need to update the data stored? You use a panel. Correct the business rules set so far? You use a panel.
However, panels are only a part of the PeopleSoft package. Panels are the user interface through which users can access the database. It is this aspect that is covered in this chapter. Learning to write PeopleCode or using PeopleCode is covered in later chapters. Two other areas that are not covered here, are reports and COBOL programming. Using Crystal Reports or any other reporting program has really nothing to do with PeopleSoft. The same holds good for COBOL. Legacy code and other reasons have made COBOL the language of choice for defining business processes.
It may seem pointless to replicate PeopleSoft panels as creating a set of panels is not difficult as you have seen in the last chapter. But developing a sensible application with PeopleSoft would be a too long drawn out affair. In fact, this is where many tutorials fail, simply because they attempt to explain too much in one go. By replicating PeopleSoft panels, you not only get the chance to create applications that do something, but you also understand how you can modify a part of the PeopleSoft application. Customising a standard application packages to suit a company’s needs is the only way to getting computerised quickly. This is what accounts for a major part of the programming activities today.
Approval Rule Set
Over the course of this book, we will cover some of the most ‘difficult’ parts of PeopleSoft and by the end, you will find that there is really nothing difficult at all.
Take a look at the PeopleSoft panels that you will create. Creating these panels will not take as long as you think. But it does need you to pay attention to the different steps involved. The panels we selected govern the way in which approvals get done, or the process involved in getting an approval. Click Go | PeopleTools | Workflow Administrator as in fig.1.
Fig.1: Opening the Workflow Administrator
Your screen will flash a bit and then after a short pause, you will see the Workflow Administrator appear. There are three menu options that you can chose from - Use, Process and Inquire. (The others are the standard menu options that come with every menu.) The panels that you will replicate are linked to the first menu item under Use — Approval Rule Definition. These panels define how approvals take place in the company. However as a programmer, this will not concern you just now.
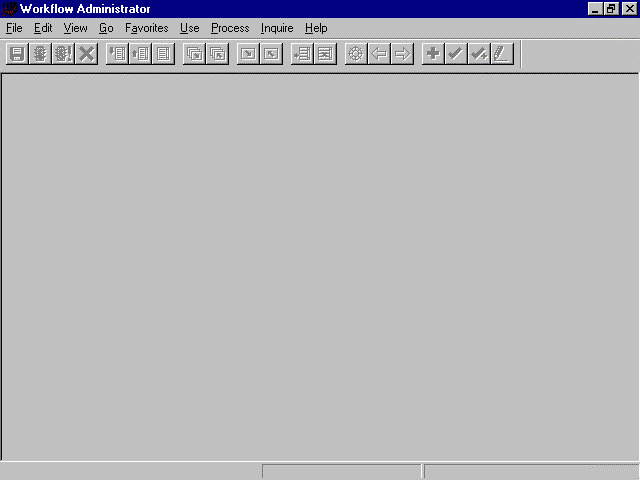
Fig.2: The Workflow Administrator
As fig.2 shows, the Workflow Administrator is pretty bare, but then most of the applications in PeopleSoft are. You could put the pizzaz in these panels if you have the time. However, with the demand for good programmers constantly increasing, you will most probably not wish to spend time in making cosmetic changes. You will also notice that the button bar is grayed. This is because there is nothing on the display for the buttons to work on. The application has been started, but to do anything you need to use panels. And panels are connected to the menu items that you can see. As you go along, pay attention to the details. The Title bar, for instance, will keep you informed as to where in the application you are.
Examine a panel set of this application. Click Use | Approval Rule Definition | Update/Display.

Fig.3: There are menus in menu, in menus
You will notice that this application has more menu items than what you had created in the last chapter on basics. The rule is that each application is complete in itself. As you get through with the basics, you will find that you too can place panel groups together and link them to menu items. There are only three Actions available for the panel group. This is defined by selecting the Actions in the Panel Group Properties for the panel group.
Once you select Update/Display, you will have a new panel that pops up requesting you to fill in a couple of details. What you need to do here is to fill in the name of a Search record.

Fig.4: Filling in the Search Record details
The Title bar of the window in fig.4 is now a series of labels separated by hyphens. The bar is a quick way to check how many menu levels down one has drilled down to. You will find this bar helpful to track down different menus later on. Notice the child window too keeps track of where what is from. Since, the Update/Display option has been selected, you will be prompted, but not forced to fill-in the value for the search record. Further, the Search record could have nothing to do with the panels that will be displayed at all. These records are used as qualifying entries so that the correct entry or correction is made into the record displayed in the panels.
Click OK and a list will appear to help you fill in the same. Notice that both the fields are displayed in the list.

Fig.5: Selecting the Search record
Highlight the Journal Entry Approval entry from the list and then click Select. The screen now comes alive. The buttons that were grayed are now active. The display area of the screen is not blank anymore. It displays one out of four panels that belong to a group. You could have selected any of the four options that were placed on the menu, and you would get the same result. The panel displayed will be the one that you selected from the menu, but you will still be able to access any of the others by clicking on the panel tab. Since this is a group, you will still have to fill in details in all panels before saving the entry.

Fig.6: The Steps Update/Display panel
What you see in fig.6 is one of the four panels that you will be replicating. Switch between this one and the other three and see what each of them contain. Not all the objects that you can see can be modified. Some of them are just displayed like the Search record values. At this point, we shall not go into the mechanics of how different objects function. What you need to do is to get familiar with the panel so that you can recognise it in later when you create your own. Data displayed in the fields could either be from the tables that the fields belong to or could be initialised (through PeopleCode) when the panel was displayed.
You may also find the three scroll bars strange. After all, most programs have a single vertical scroll bar on the right side. Try them out too and see what they do. If the slider of the bar is at the bottom, then it signifies that the scroll has reached the end; at the top however, means that scrolling is possible. Look at the foot of the panel too. The bar at the bottom displays the panel that is currently open and the mode in which the panel is.
Start the Application Designer by Go | PeopleTools | Application Designer.

Fig.7: The Application Designer
With the Application Designer you can not only create applications, but you can also find out what makes up existing panels. To modify or replicate a PeopleSoft application, it is necessary to know what is on the panels — and from which record (or table) these fields are taken. Being able to locate where what is, is not difficult. All you need to know is how to go about doing this.

Fig.8: Finding out what’s on the menu today
The first thing to do, is to locate the menu to which the panel group is linked. The rules and other operations that you learned so far still hold good. You know the name of the application that you just opened. You therefore also know the name under which the menu was saved. To open a menu, follow the same sequence used so far. In the Application Designer, click File | Open. Since everything is stored in a PeopleSoft table; you need patience and a bit of knowledge to locate the menu. What makes the task a bit easier, is that PeopleSoft does not use silly names like we do. It is possible to guess with some amount of confidence what the record is for or in which record or panel a field is placed.
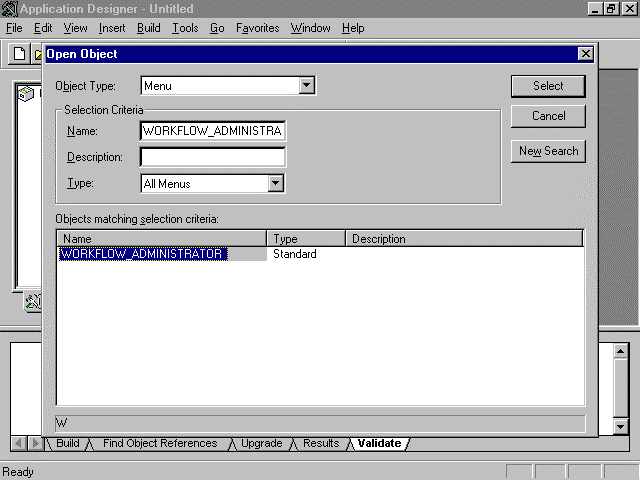
Fig.9: The menus found under W
What we need to find is the Workflow Administrator in fig.2. It is therefore safe to assume that this program would have a name related to Workflow. Fill in the dialog box that pops up with the details known. The Object Type being sought is Menu. It begins with a W and should be found among all other menus. With this scant information, click the Select button and in the Objects matching selection criteria window below, a list of all menus starting with W will appear. Clicking the Select button without W would give an entire list of all the menus found in PeopleSoft.

Fig.11: The Workflow Administrator menu
The name under which a menu is saved is the name of the application and this appears in the Go menu list. In fig.2, the Title bar read Workflow Administrator. Hence Workflow Administrator is the menu we seek and is the only menu that starts with W. The contents of this menu is not important. What matters is the link from the menu to the panel group. If you are reasonably sure that you can locate a panel group without first locating the menu, use the same method. Select Panel Group under File | Open option in the main menu. Notice, you do not have to start or locate a project to get to the menu, panel or any other object.
This exploratory work is the easiest way to find what is used by saved panels. You can therefore shut the Project Workspace and the Output windows by pressing Alt+0 and ALT+1.

Fig.12: You could add options to the menu
The menu for the entire application is displayed. We do not require anything from Process or Inquire. The Properties of the main menu item — Use, is of no help. What you need to check are the values for the first menu item in the Use menu — Approval Rule Definition. Click Use to open the menu and then right-click on Approval Rule Definition. Select the last item, Item Properties, on the pop-up menu that appears as seen in fig.14.
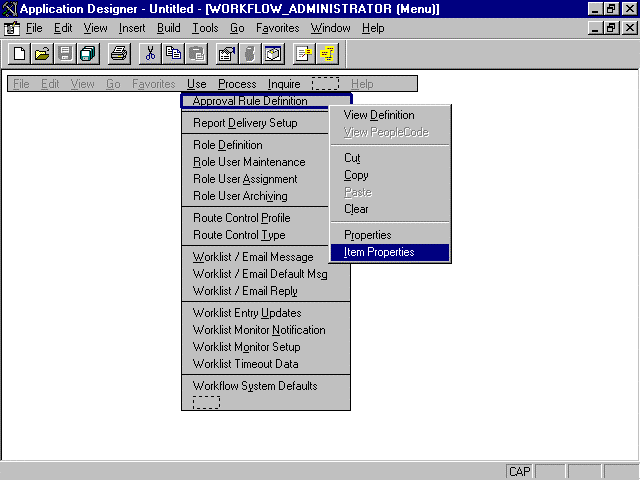
Fig. 14: Select the last menu item and list the windows/panel properties
This dialog box is where one enters the Panel Group name and therefore, it is also the right place to find which Panel Group is assigned to the menu item. To clear any doubts you have, right click on any of the other menu items and you will find other panel groups assigned to the other menu items.

Fig.15: Menu Item Properties
Menu Item Properties holds the name of the Panel Group that we seek — APPR_RULE under Panel Group. None of the other fields are important to us just now. You do not need anything else in this panel. Click Cancel to close it.
To open the Panel Group APPR_RULE, that holds the set of panels to recreate, click File | Open and select Panel Group under the Object Type.

Fig.16: Open the Panel Group APPR_RULE
While previously variable and other object names were cryptic in nature, the evolution of newer, better programming languages permit longer variable names and therefore ones that make more sense. Since the panel set had something to do with Approvals, a reasonable guess would be APPR under the Selection Criteria as done in the case of the menu. Both methods would have worked just as fine. What we need to locate are the panels used by the Approval Rule Definition menu item.
Click Select and you will see that you have opened the correct Panel Group. Fig.17 lists the individual panels that form the group. None of the panels in this group are hidden nor is there any value entered in Folder Tab Label.
Though the Panel Name for all panels appear to be the same, this is not really so. Increase the column width a bit more and you will find that each has a unique name. To avoid any mix up, the prefix is the same, which is what is visible, but the last part unique. The Item Name also differs. This identifies individual panels within groups. While the Item Name is used internally, the Item Label appears on the menu bar, which is why there are & signs in front of each label. The & sign only marks which character will be underlined in the menu. Windows programmers should be familiar with this. The last column is for an optional Tab name, a name that will appear on the tabs of the panel. This could differ if you like from the menu item.

Fig.17: The list of panels that form the APPR_RULE Panel Group
Even PeopleSoft finds the Folder Tab Label field redundant though it included the field. Make sure the selection is right. After all, there could be other panels with exactly the same name. Right-click any of the entries in the panel group, and select Properties. Panel Group Properties, as you can see in fig.19, define the Search record and the Actions to execute.

Fig.19: Check that this Panel Group uses the right Search record
Double-click the first item in the list to see what the Step panel looks like, as in fig.20. The only spots that appear to be blotted out are the Search record fields at the top. The rows of As indicate that they are display fields. There is no change in the appearance of the other fields at all.
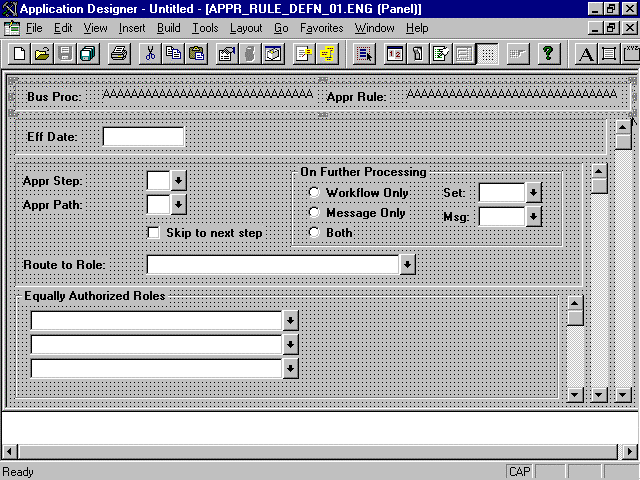
Fig.20: The Steps panel in the raw form
Get ready to exercise your fingers in a while. This will be the most boring part as you create each panel that the application already uses. You will get plenty of exercise from switching between one application and the next. If this gets confusing, keep just one copy of the application running and switch between two windows. Start by File | New | Panel to create a new panel. You will be able to switch between this project and the other panel using Ctrl+Tab.
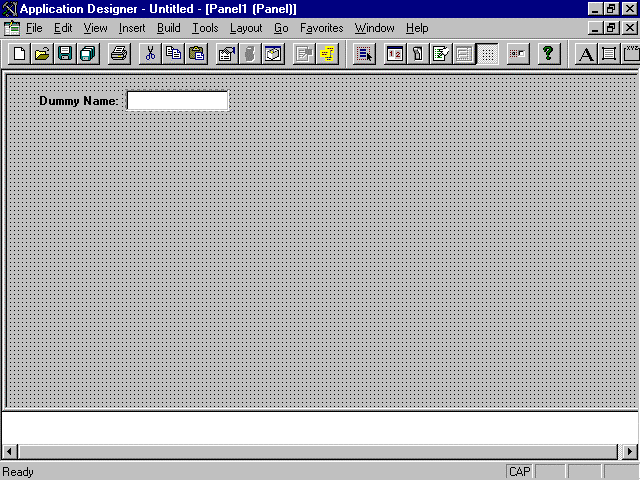
Fig.21: Creating a new set of panels.
To save you a little bit of time, you can do a couple of things. Ensure that objects that you create or modify are automatically added to the current project. This saves time by inserting the objects into the project automatically. To do this, in the Application Designer, click Tools | Options and under the Project panel select the radio button that states When object is modified and saved in the group Insert Object into Project.

Fig.22: Select a field and click Ctrl + F to check the field’s properties.
Right-click on any of the objects and a pop-up menu appears. The last item on this menu, which is Panel Field Properties, holds all the details of the field selected. These details let you know the table from which the field was taken, how it is displayed and used. The dialog box that appears will let you know where the record field has been taken from and the settings for it. Use these details to get the same field included on your panel. Using this method, you will be able to find out the settings for all the fields on a panel, even the ‘invisible’ ones.
Fields placed on panels do not require to be displayed when the application is running. Programmers have the ability to place hidden on the panel. These fields can only be seen when the panel is opened in the Application Designer.

Fig.23: The Record details
The settings in the Panel Field Properties dialog box need to be duplicated too. In this panel only the first two entries — Record Name and Field Name, are important. These will ensure that your panels access the same fields from the same table that PeopleSoft’s does. The other settings in this panel are more for cosmetic value than any important work. Experiment and you will find that Size controls the display size of the field, which you can set to anything. Alignment will appear again in the next panel — Label, though here it controls the placement of the entire field. Display options decide how the field contents appear on the screen. You could also add a character that will be displayed in the Edit box. Try them out and you will understand better what each does.
This is just one of three panels that contain information about the field displayed. The next two panels define the label that appears with the field and how the field will be used.

Fig.24: Labels can be of different types
As promised in fig.24, there is another Alignment radio button set. This Alignment decides where the label will appear, while the Display Options decides how it will appear on the panel when the application is run. This is another time to experiment and see results.

Fig.25: A field can be used in different ways
Notice that there is an option to hide or make a field invisible. Since we selected the first field — Bus Proc — which is only for display, there is a tick mark against the Display Only checkbox. If you try the Invisible option, do not think that your computer or software has stopped working properly, just because it still appears on the screen. All fields placed on panels are displayed in the Application Designer. It is only when the program is being run that the display settings take effect.
You will have to check these panels for every field in every panel of the APPR_RULE panel group. Use Ctrl + Tab and switch once more to the new panel that you created and right-click on the Edit box that you inserted. Select the last item on the pop-up menu that appears — the Panel Field Properties box. Fill in the same values that as for the Bus Proc field. You can therefore locate and place all the panel.

Fig.27: Setting the values for your ‘Dummy’ field
Once the settings are made, the field gets formatted automatically. This is because some values like the length and type of the field are picked up from the table specified, and other default values are accepted. You do not need to type in a label either. At least not here. If you recall, when creating fields in the last chapter, you had to fill in a Long Name and a Short Name. It is these Long and Short names that are selected here. Since the field is only for display, the Edit box disappears and is replaced by As. You will also notice that it has grown in length, the length of the field. The size is decided by selecting Size in the Panel Field Properties | Record panel.
Fig.29 introduces another object onto the panel. To add in a scrollbar, click Insert | Scrollbar and then use the hand symbol that appears to drag down a scrollbar on the panel.

Fig.29: Adding scrollbars to panels
You do not have to place them left or right, nor for that matter stretch them to the full length of the panel. The functionality of the scrollbar is not governed by it’s length, size or position but by its use. Scrollbars are important in PeopleSoft and used correctly, they can increase the overall utility of a program. We will repeat this time and again, simply to drill in the fact that scrollbars are important. These bars group fields into sub-groups. You could also consider scrollbars as pretty ways of displaying ‘mini’ records, or records within records. This may sound silly just now, but it will become clearer as you go along. To define scrollbar groups one uses the Properties panel (as shown in fig.31) for the scrollbar and in the Order list that will be covered in a minute.

Fig.31: Setting scrollbar properties
Right-click on the scrollbar and select the Panel Field Properties menu option. The dialog box that appears is different from that displayed for a field. Since the scrollbar is also an object placed on the panel, it also has to be identified by a unique name. Label is important only as far as it identifies the scrollbar that groups the objects below it. The label does not ever appear on the panel itself but is used internally by PeopleSoft.
The Use, as shown in fig.32, is more important as it decides the hierarchy of the objects placed and the number of times group objects are repeated.

Fig.32: Use of a scrollbar
The Occurs Level and Occurs Count are covered more in detail in a couple of pages. For just now, set both to 1. Incidentally scrollbars cannot start on Occurs Level 0. Try doing this and you will get an error. The Field Use Options is not important. Ignore it and the rest of the panel.
To make the scrollbar make more sense, add in another field. You can place the other Search record field — Appr Rule: — which is also a display field like Bus Proc. Do this in exactly the same fashion as you did the first. Click Insert | Edit box and then place an Edit box on the panel. Switch to the original panel and then check the Panel Field Properties for the Appr Rule: field. Use the same settings on your panel.
There are now two fields on the panel and one scrollbar. Both fields placed on the panel are set to Display Only. Once they are sized and positioned, click Layout in the menu bar as in fig.34 and select Order.

Fig.34: Setting the panel objects in order

Fig.35: The Order Panel list
The Order Panel lists all the objects on the panel. Through this list, one also sets the order of the objects on the panel. There are other objects besides Edit boxes that you can place on a panel — frames, push buttons, trees, grids, images. The scrollbar, however, has a special function. Scrollbars, placed in PeopleSoft panels, are different from the scroll bars that are on the edge of a window. These scrollbars scroll fields not the display. The bar allows one to place multiple values of the same type together. To group fields under a scrollbar, you need to reassign the order of the objects that are on the panel. This is done by defining the level at which the object is placed. (Consider these levels like layers, which means that everything on the same layer is at the same level or vice versa.)
With the two objects that you have placed, you can attempt rearranging or reordering the list. Look at fig.35. The first column — Num, is the order in which one will move from one field to the next while using the Tab key on the panel. The second column states the Occurs Level. Column three is the text that appears for a field as a Label. Type is the type of object placed on the panel, like Edit boxes, Check boxes, etc. The next two columns — Field and Record, states the field name and the record from where the field was got.
Reordering the objects that are on the panel takes no effort at all. You first have to decide on what level each object will be. In this case, switch applications and check the original APPR_RULE panel set and note the order. Usually objects that perform no work on the panel or that belong to the entire panel rather than a small sub-set — like frames, buttons, code, pictures, are placed at Level 0. You are not allowed to place a scrollbar on this level however, as scrollbar groupings are only allowed from Level 1.
To change the grouping or level order, highlight the object that you need to move, as shown in fig.36, and the click the Select button.

Fig.36: Select an object to move
The highlighted object will disappear from the list. Now highlight the line after which the object should appear. In this case, we need to move Appr Rule to Level 0 and it should appear after Bus Proc. Fig.37 shows this being done.

Fig.37: Positioning the object correctly in the list
You have two choices at this point — you could either Move or Unselect the selected object. Since Move is what you need to do, click the Move button. The object that disappeared earlier, reappears in the line below the highlight. Check your result with fig.38. The order Number and the Level change automatically once the list items are moved.

Fig.38: Completing the move
The Occurs Level of the scrollbar is important. Any object placed after a scrollbar is automatically set at the Occurs Level of the scrollbar. Hence, any object added to the panel or placed in the Order list after Scroll Bar 1 will get be set at Order Level 1. This Order Level will stay in force until it is changed by another scrollbar. Use this Order panel at the end to re-order all the objects placed on the panel, as the objects may not be placed in the right order.
Your task right now is to switch back and forth between the two open panels in the Application Designer and recreate the original PeopleSoft panel. Repeat the previous steps for all the other objects on the Workflow Administrator's panel. Everything is just a point-and-click. Do not spend time on deciding if you need a Text box or a Dropdown list. This really does not matter. Place Edit boxes and then set the properties for the object. PeopleSoft will use default values for the object by finding the field’s properties in the table. Hence, if the field was defined as a list box, then the object placed on the panel will be a list box.
To speed up your work a bit more, you can have a complete list of all the fields used in a particular panel by selecting Print from the File menu, when viewing the panel. This is much easier than switching back and forth between the original panel and the one you are creating. Print will also print a view of the panel in question on a separate page. When viewing panels in the Application Designer, you may also come across fields that are hidden or not visible in the normal mode. It is for this reason, you cannot just create a panel from looking at it, but need to examine what goes on in the background. When you complete this panel call it A1.
|
Num |
Odr |
Field Type |
Label Text |
Fld Name |
Record Name |
|
1 |
0 |
Frame |
Frame |
|
|
|
2 |
0 |
Edit Box |
Bus Proc |
BUSPROCNAME |
APPR_RULE_HDR |
|
3 |
0 |
Edit Box |
Language Code |
LANGUAGE_CD |
PSOPTIONS |
|
4 |
0 |
Frame |
Frame |
|
|
|
5 |
0 |
Edit Box |
Appr Rule |
APPR_RULE_SET |
APPR_RULE_HDR |
|
6 |
1 |
Scroll Bar |
Scroll Bar |
|
|
|
7 |
1 |
Edit Box |
Eff Date |
EFFDATE |
APPR_RULE_LN |
|
8 |
2 |
Scroll Bar |
Scroll Bar |
|
|
|
9 |
2 |
Frame |
Frame |
|
|
|
10 |
2 |
Edit Box |
Appr Step |
APPR_STEP |
APPR_RULE_DETL |
|
11 |
2 |
Group Box |
On Further Processing |
APPR_RULE_ROLE |
|
|
12 |
2 |
Edit Box |
Appr Path |
APPR_PATH |
APPR_RULE_DETL |
|
13 |
2 |
Edit Box |
Route to Role |
APPR_RULE_DETL |
|
|
14 |
2 |
Group Box |
Equally Authorized Roles |
APPR_RULE_ROLE |
|
|
15 |
2 |
Check Box |
Skip to next step |
APPR_SKIP_SW |
APPR_RULE_DETL |
|
16 |
2 |
Radio Button |
Workflow Only |
APPR_WF_ERR_SW |
APPR_RULE_DETL |
|
17 |
2 |
Radio Button |
Message Only |
APPR_WF_ERR_SW |
APPR_RULE_DETL |
|
18 |
2 |
Radio Button |
Both |
APPR_WF_ERR_SW |
APPR_RULE_DETL |
|
19 |
2 |
Edit Box |
Set |
MESSAGE_SET_NBR |
APPR_RULE_DETL |
|
20 |
2 |
Edit Box |
Msg |
MESSAGE_NBR |
APPR_RULE_DETL |
|
21 |
3 |
Scroll Bar |
Scroll Bar |
|
|
|
22 |
3 |
Edit Box |
All Authorized Roles |
ROLENAME |
APPR_RULE_ROLE |
Just in case you are not able to print the list, we created a table that shows all the important fields and its labels. As you go through each of these lists, you will find some of the field names repeated. Using same field names from different records on a panel is understandable, but the same field from the same table takes a little getting used to. This happens only in the case of radio buttons. You will find the only thing changed was the label assigned to the field when placed on the panel. No other field can be duplicated on a panel except when using a scrollbar. Even then, field is actually placed only once, the scrollbar automatically replicates it.
Since you are working in Windows and program follows all the rules of Windows, you can also quickly replicate the panels by copying and pasting objects from one panel to the next. You could also use the Save As option that appears under the File menu. However, we strongly recommend that you create each panel from scratch. This way you will remember the steps in creating panels and also the fields placed on the panels. In writing the Virtual Approver, you will have to refer to some of this.
Do not forget to save and name the panels you create. You could modify the layout of the panel and yet maintain the same functionality as shown in the figure. There are no rules as to where scrollbars or any other objects on a panel appear. These could be placed anywhere on the panel. What you do need to do however, is to maintain the order of appearance and the level number. The names of the panels are the names that will appear on the Tabs. Proceed to do the same for the other three panels and name them A2, A3 and A4.
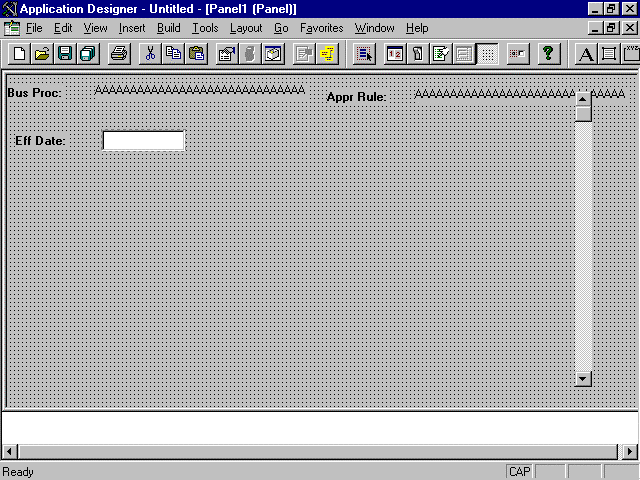
Fig.39: Add objects one-by-one following the original
The other panels have the following details. Remember that the names you give the panels are not important. What is important is getting the right fields from the right tables.
Panel 2
|
Num |
Odr |
Fld Type |
Label Text |
Field Name |
Record Name |
|
1 |
0 |
Frame |
Frame |
||
|
2 |
1 |
Scroll Bar |
Scroll Bar Level 1 |
||
|
3 |
1 |
Edit Box |
Eff Date |
EFFDATE |
APPR_RULE_LN |
|
4 |
1 |
Frame |
Frame |
||
|
5 |
2 |
Scroll Bar |
Scroll Bar level 2 |
||
|
6 |
2 |
Edit Box |
Appr Step |
APPR_STEP |
APPR_RULE_DETL |
|
7 |
2 |
Edit Box |
Path |
APPR_PATH |
APPR_RULE_DETL |
|
8 |
2 |
Edit Box |
Role Name |
ROLENAME |
APPR_RULE_DETL |
|
9 |
2 |
Check Box |
Amount? |
APPR_AMT_SW |
APPR_RULE_DETL |
|
10 |
2 |
Check Box |
Field? |
APPR_FLD_SW |
APPR_RULE_DETL |
|
11 |
2 |
Check Box |
Quantity? |
APPR_QTY_SW |
APPR_RULE_DETL |
|
12 |
2 |
Group Box |
Amount |
APPR_RULE_DATE |
|
|
13 |
2 |
Group Box |
Quantity |
APPR_RULE_DATE |
|
|
14 |
2 |
Group Box |
Field |
APPR_RULE_DATE |
|
|
15 |
3 |
Scroll Bar |
Scroll Bar 1 |
||
|
16 |
3 |
Edit Box |
Seq |
APPR_RULE_SEQ |
APPR_RULE_AMT |
|
17 |
3 |
Edit Box |
Minimum |
MAX_CREDIT_AMT |
APPR_RULE_AMT |
|
18 |
3 |
Edit Box |
Maximum |
MAX_DEBIT_AMT |
APPR_RULE_AMT |
|
19 |
3 |
Edit Box |
Record |
RECNAME |
APPR_RULE_AMT |
|
20 |
3 |
Edit Box |
Amt Field |
FIELD_PLNFIELD |
APPR_RULE_AMT |
|
21 |
3 |
Edit Box |
Currency Code |
CURRENCY_CD |
APPR_RULE_AMT |
|
22 |
3 |
Scroll Bar |
Scroll Bar 2 |
||
|
23 |
3 |
Edit Box |
Seq |
APPR_RULE_SEQ |
APPR_RULE_QTY |
|
24 |
3 |
Edit Box |
From |
FROM_QTY |
APPR_RULE_QTY |
|
25 |
3 |
Edit Box |
To |
TO_QTY |
APPR_RULE_QTY |
|
26 |
3 |
Edit Box |
Record |
RECNAME |
APPR_RULE_QTY |
|
27 |
3 |
Edit Box |
Qty Field |
FIELD_PLNFIELD |
APPR_RULE_QTY |
|
28 |
3 |
Scroll Bar |
Scroll Bar 3 |
||
|
29 |
3 |
Edit Box |
Seq |
APPR_RULE_SEQ |
APPR_RULE_FIELD |
|
30 |
3 |
Edit Box |
Rte Cntl |
RTE_CNTL_TYPE |
APPR_RULE_FIELD |
|
31 |
3 |
Edit Box |
Record |
RECNAME |
APPR_RULE_FIELD |
|
32 |
3 |
Edit Box |
Field |
FIELD_PLNFIELD |
APPR_RULE_FIELD |
Panel 3
|
Num |
Odr |
Fld Type |
Label Text |
Fld Name |
Record Name |
|
1 |
0 |
Frame |
Frame |
||
|
2 |
1 |
Scroll Bar |
Scroll Bar Level 1 |
||
|
3 |
1 |
Edit Box |
Eff Date |
EFFDATE |
APPR_RULE_LN |
|
4 |
1 |
Frame |
Frame |
||
|
5 |
2 |
Scroll Bar |
Scroll Bar level 2 |
||
|
6 |
2 |
Edit Box |
Appr Step |
APPR_STEP |
APPR_RULE_DETL |
|
7 |
2 |
Edit Box |
Path |
APPR_PATH |
APPR_RULE_DETL |
|
8 |
2 |
Edit Box |
Role Name |
ROLENAME |
APPR_RULE_DETL |
|
9 |
2 |
Group Box |
Pre-Approved Activity/Event |
APPR_RULE_DETL |
|
|
10 |
2 |
Edit Box |
Activity |
ACTIVITYNAME |
APPR_RULE_DETL |
|
11 |
2 |
Edit Box |
Event Name |
EVENTNAME |
APPR_RULE_DETL |
|
12 |
2 |
Group Box |
Deny Activity/Event |
APPR_RULE_DETL |
|
|
13 |
2 |
Edit Box |
Activity |
DENY_ACTIVITYNAME |
APPR_RULE_DETL |
|
14 |
2 |
Edit Box |
Deny Event |
DENY_EVENTNAME |
APPR_RULE_DETL |
|
15 |
2 |
Group Box |
Recycle Activity/Event |
APPR_RULE_DETL |
|
|
16 |
2 |
Edit Box |
Activity |
RECYCLE_ACTIVITYNAME |
APPR_RULE_DETL |
|
17 |
2 |
Edit Box |
Recyle Evt |
RECYCLE_EVENTNAME |
APPR_RULE_DETL |
Panel 4
|
Num |
Odr |
Fld Type |
Label Text |
Fld Name |
Record Name |
|
1 |
0 |
Frame |
Frame |
||
|
2 |
0 |
Edit Box |
Bus Proc |
BUSPROCNAME |
APPR_RULE_HDR |
|
3 |
0 |
Edit Box |
Appr Rule |
APPR_RULE_SET |
APPR_RULE_HDR |
|
4 |
0 |
Check Box |
Approval Check Active |
APPR_ACTIVE_SW |
APPR_RULE_HDR |
|
5 |
0 |
Group Box |
Rule Base Currency / UOM |
APPR_RULE_HDR |
|
|
6 |
0 |
Edit Box |
Currency |
CURRENCY_CD |
APPR_RULE_HDR |
|
7 |
0 |
Edit Box |
Rate Type |
CUR_RT_TYPE |
APPR_RULE_HDR |
|
8 |
0 |
Edit Box |
Unit of Measure |
UNIT_OF_MEASURE |
APPR_RULE_HDR |
|
9 |
0 |
Group Box |
Application Currency Recfield |
APPR_RULE_HDR |
|
|
10 |
0 |
Edit Box |
Record |
RECNAME_CUR |
APPR_RULE_HDR |
|
11 |
0 |
Edit Box |
Fieldname |
FIELDNAME_CUR |
APPR_RULE_HDR |
|
12 |
0 |
Group Box |
Approval Activity/Event |
APPR_RULE_DETL |
|
|
13 |
0 |
Edit Box |
Activity |
ACTIVITYNAME |
APPR_RULE_HDR |
|
14 |
0 |
Edit Box |
Event Name |
EVENTNAME |
APPR_RULE_HDR |
A quick look at the different objects that you will encounter should let you know what to expect as you go along. The Edit box comes in many forms. Some allow edit, some just display text. Others could be dropdown boxes or list panels etc. This box is used the most in PeopleSoft panels. The other objects that you will also be used to and should not pose a problem are the checkboxes and radio buttons. These usually form a part of a group. While checkboxes do not require other checkboxes alongside, radio buttons do. These buttons are mutually exclusively buttons. Hence, if any one is selected, the others are automatically deselected. You will have to accordingly have to draw group boxes around radio buttons to get these to function correctly.
Once you create all four panels, place them in a Panel Group. The procedure is no different from what you have done so many times before. Click File | New | Panel Group and then OK. Since you saved the panels, they will automatically be added to the Panels folder on the left. Open this folder and drag-and-drop each panel on to the Panel Group list. Save the panel group and link it to a menu. Name the panel group APG1.

Fig.40: Place all four panels in a Panel Group
Oops! You got an error. At least, you should have if you did not specify a Search record for your Panel Group. To check this out, switch to the original and check the Properties for the Panel Group. This is done by right-clicking the list in the Panel Group window, and selecting Properties. Under Use, you will find that there is a Search record mentioned in the Access group — APPR_RULE_HDR. (See fig.19) Another Access option that you can see in fig.41 that can confuse, is the second option — Add search record. Don’t think of any fancy explanations. This field is just what it says — Add search record. It is a field that defines the Search record for the Add action.
Note also Actions checked for this set of panels. Only three of the five are selected for use, which you could see in the last menu that was displayed. Functionality of the panel could be increased or decreased by selecting or deselecting an Action.

Fig.41: Set the Panel Group Properties
Switch back to your Panel Group and make the required changes. Save the panel group. The menu link follows the same pattern used earlier. Create a two level menu like you had done earlier. Again remember, what you call the menu finally will become the application name finally. Fig.42 shows properties being set for the menu that will appear in the application. We called the menu APPRMENU. The sub-menu item is listed as APPRL1. Finally, the application takes the name that you save your menu with. In this case, it was called Approval.

Fig.42: Defining the menu and the application name
Restart PeopleSoft so that the menu appears on the Go menu list. If you created the panels and the group right, the menu option will display the panels that you created and will access the very same data fields that you did earlier using the Workflow Administrator. Check this out by accessing and modifying the entry that you had made in the Workflow Administrator - Approval Rule Definition.
Confirm that this works both ways. Make an entry here. Close this application and run the Workflow Administrator. Now select the Approval Rule Definition. You will be able to access and modify the record here. Click Go and you will also see Approval in the menu list as shown in fig.43.

Fig.43: Our Approval is added to PeopleSoft
Run this application, and you will find that it functions in exactly the same manner as the original application. Select an option from here, preferably the Update/Display that you used earlier and you will be prompted with the Search record field.

Fig.44: Though the menu labels are different, the options are the same
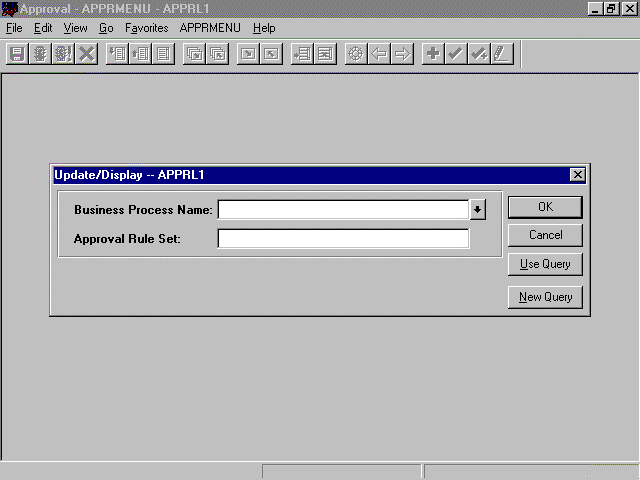
Fig.45: Enter the Search record to go ahead
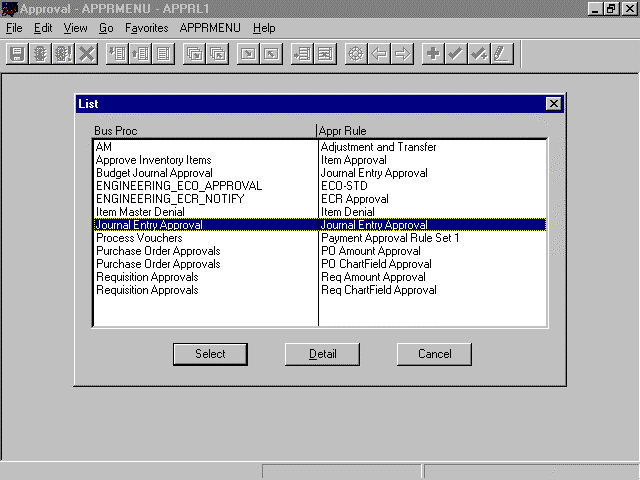
Fig.46: Choose a Search record from the list as before
Click OK and you are present with the very same list that you had used in the Approval Rule Definition menu. If you did modify the Journal Entry Approval entry, then the change will be reflected here too.
What you have done with this panel group, you can do with any of the other panels that are there in PeopleSoft. It is also possible to add supplementary panels, or modify any panel supplied by PeopleSoft in the same manner. Or if you rather, you could keep PeopleSoft panels exactly the way they are and replace them with yours by simply modifying the link that the menu has with the panel. None of this is complicated to do.
Adding extra panels to an existing set, requires one to add extra panels to the APPR_RUL panel group. While changing the link, requires a change to the WORKFLOW_ADMINISTRATOR menu. All this needs is File | Open | Panel or Menu and then the necessary changes.
Summary
This is a rather short chapter, it however, does cover all that is required for you to start creating your own panels that work with the PeopleSoft implementations supplied in the package. Depending upon the type of work involved, you can now also modify the original PeopleSoft panels and in a while, you will be also changing the code.
At the beginning, most users feel that making changes to PeopleSoft panels themselves is a task beyond them. But at this point, you now know there is no real challenge in duplicating or substituting PeopleSoft panels for your own. What will challenge you a bit is the Virtual Approver and the Virtual Router that is covered in subsequent chapters. These are by far the biggest programs or functions that are used in PeopleSoft. This will also follow the same lucid style that this chapter did. Apply yourself and read this chapter again so that you are sure of all the terms and concepts used. You are now ready to go ahead into deeper waters.